Pages

Thursday, September 22, 2016

Swimsuits and Summer


I've always had a slight obsession with swimsuits. I started this swimsuit right before I saw the Sophie swimsuit pattern come out! I always wanted a swimsuit of this style but I could never find a pattern, and I never really wanted to tackled the bra cup portion of it without a starting point. I briefly thought of abandoning this one and buying the pattern, but this one was working out really well so I continued, while envying all the amazing Sophie makes as I sewed. I can always make another swimsuit right? or 10 more...


I am really glad I didn't restart because I'm so happy with the end result! I pieced this pattern together with various things. I started with tracing out my favourite swim bottoms, then combined that with the Boylston bra pattern from Orange Lingerie. And I compared the pattern to a few others to make sure I was getting the proportions right. I loved the Boylston bra pattern, but I did have trouble finding my size. I usually wear a 34B, but that was way too small for me on this pattern. I ended up making a 34C, but if I made it again I might even make a 36C or 34D. All in all this one fits pretty well! I think part of the issue too was finding good underwires. There really aren't good resources for that kind of thing here and it does take a bit of experimenting.


I decided to line the whole thing, so its pretty thick, almost like a wet suit! The only issue is that it's almost impossible to get on!!! It's basically like doing up the back of your bra and then trying to shimmy it on legs first! But I didn't want to ruin the smooth back so I just put up with it.


Me and my sister went hiking on the last day of my holidays and we found this amazing lake! It was basically a private lake, in the middle of nowhere with only one cottage way on the other end. We thought the mosquito season was mostly over so neither of us wore any bug spray, but little did we know this area was known for having some of the worst mosquitos! So I wasn't so much hiking as I was literally running through the trails with my arms batting the bugs away from my face! Luckily, once we got to the lake the pests cleared.


.  .  .

I've been out relaxing at my beautiful cottage for my holidays. My family cottage is honestly kind of amazing, with only a few other cottages on the entire lake, but it has no electricity, or plumbing, or basically anything else! So I love it for a few days but then I'm anxious to get home and start sewing again!


Monday, September 5, 2016

My New Venture & a Pretty Summer Dress


I have launched my new website! mousseline-patterns.com. I am starting a new venture and I thought I needed a website that better represented it. I will continue to post my next few posts on this blog, hopefully until anyone who wishes to follow me over to my new website has had the chance to do it. I am starting a new venture as an independent sewing pattern designer! I am currently working on my first pattern and I hope to share it with you guys soon. Home sewing seems to have a skipped a generation and re-emerged online in a really exciting new way and I can't wait to be a part of it. I love to sew other patterns as much as I love to design my own. I will continue to post my sewing projects on my new website as I did on this one, and I will also post tips and tricks as well as notes on my future patterns.


...

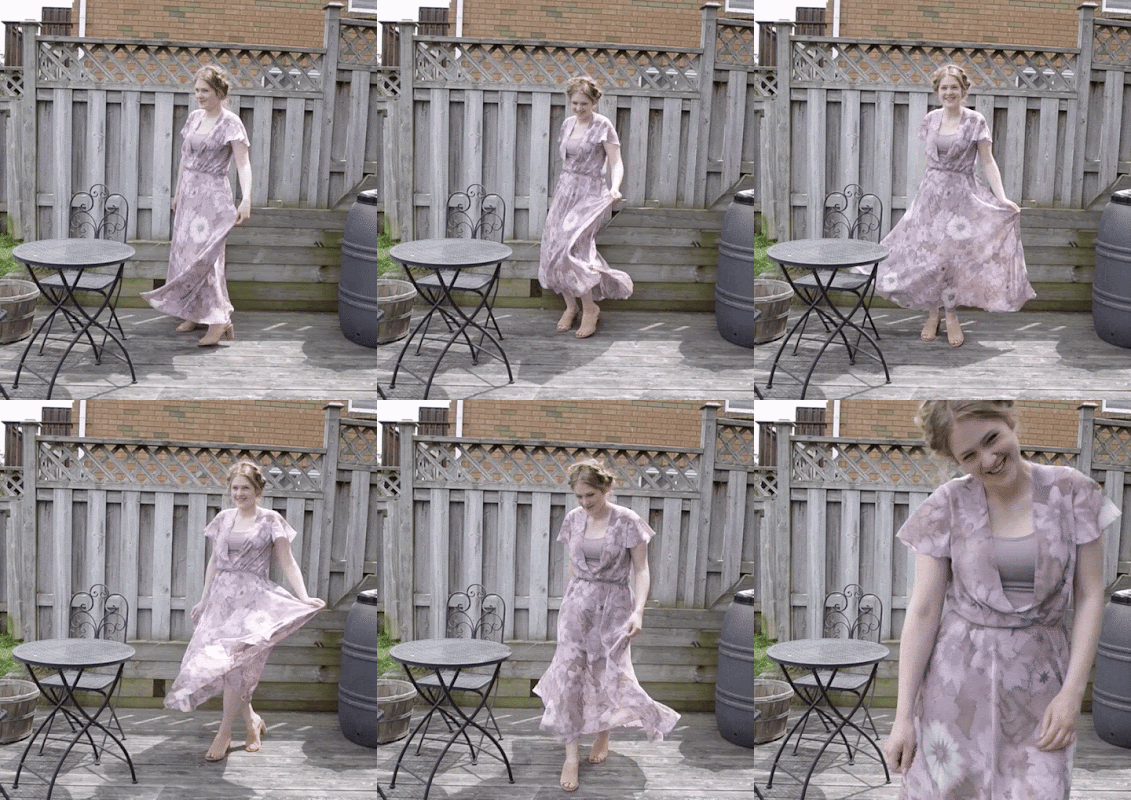
I made this dress little while ago and I've been saving it for my very first post on the new website. This is a Kathryn Brenne Original Vogue pattern 9168. If you don't already know, I work as Kathryn's assistant, and while we were working on this design at the studio, it took forever to get it just right. So when I picked up my fabric to make one for myself, I was preparing myself for a really long involved sewing project, but it was surprisingly quick to sew up! I guess since all the kinks were ironed out before it went to print, it was just smooth sailing the whole way!


I read a review of this pattern before I started it, saying the skirt was wrongly printed with a 'cut on fold' marking, I bought my pattern not long after that and it was already rectified on my copy. We posted some tips for sewing up this design on The Academy of Fine Sewing and Design website which are quite useful. Although the dress is a pretty simple design, all the fine finishings really make the garment special.


This dress is impossible not to spin in! As soon as you put it on it demands to be spun in! I like how light and floaty the dress is, and i think it could work for formal dress or just a day dress as well. I chose to make a different slip to go under this dress. Since I wanted to wear it more as a day dress, I made a jersey body-con type slip to go underneath. I used Closet Case Files Nettie bodysuit pattern in the dress view and just re-drafted the neckline to have spaghetti straps.


I found this fabric at Fabricland for 4$! Thats the great thing about styles of dresses like this, theres so many beautiful polyester chiffons and georgette's that are really inexpensive and turn out just as nice as some more expensive textiles. And they are super easy to wash and care for, not to mention they wear like steel!


When I was sewing the skirt side seams, I notice that one side stretched almost like a bias seam would, but the other side didn't stretch at all. This was just because of the way the skirt is cut to hang perfectly as it does, but it makes one side a bit shorter than the other after the seam has stretched. Since this skirt hangs on the bias the hem inevitably goes all over the place depending on your fabric, so regardless it needs to be evened out. But I might add a bit of extra length to the hem, because I had just enough to hem it to the length I wanted, but an inch or so extra would have been handy.


I decided not to make the belt for now, I am waiting to go down to Toronto to pick up some leather to make a leather belt instead of a fabric one. I thought a skinny purple or brown suede belt would be really pretty for this dress. And it's totally wearable without a belt too.


I am really happy with the way it turned out and I can't wait to wear it somewhere other than my backyard! Thanks for reading :)


Sunday, April 24, 2016

Cherry Blossom Evening Bag


This is a bag I made to enter in The Independent Handbag Designer Awards. I interned with a handbag designer when I was in school and she always told me to enter this competition, and I finally did this year!


About two months ago I decided I would enter, but I still didn't know what my bag would look like. Then about a month ago I thought I better get onto it and went to Toronto for supplies. I got this really beautiful cream coloured pearlized leather from The Fabric Room. I had eyed it last year but didn't have any projects in mind until now. I also got a teal coloured pig suede to line the bag from Perfect Leather. I didn't have much luck finding any hardware. It's so difficult to find any hardware here, if only I lived in New York. I quickly ordered some hardware off of Etsy, praying it would get here in time. I waited until the last minute......and it did not come. So now I had no hardware and NO time left!! At least I had my design mostly figure out so I just started it hoping I would finish it time. The deadline was April 23 at 11:59pm and I literally submitted my entry at 11:56pm. I made it JUST in time!


I was inspired by High Park in Toronto. Around this time of year its filled with beautiful cherry blossom trees. I also really like to experiment with different textures and shapes: the pearlized main leather, the purple suede circle, the pebbled leather tree and the 3D leather flowers. I hand cut and sewed on 100 flowers, each layered with a circle of pink suede and anchored with a fresh water pearl. The bag has four gold purse feet and a teal green suede lining. The lining has two pockets, one zippered and one patch pocket.


The bag is small and structured. I used a recycled leather stiffner on the front and back, I used a plastic purse bottom and I fused the side panels with shirt collar fusing.  The handles are made using plumbers tubing and overlapped to form the handle shape.


I had bought Tandy leather edge paint in Neutral, it painted on mostly clear, so I painted the raw edges with textile paint first, then used the edge paint as a top coat.


This bag was going together so smoothly, until the very end, where it just all went wrong. And at this point I only had a couple hours left, needless to say I was getting stressed. I was really wishing I had an industrial free arm sewing machine. I didn't realized the bag would basically just not fit in my machine, no matter what I did. I ended up having to take the plastic bottom out to sew the sides in, and then cover the plastic base and place it above the lining instead. But it all worked out in the end.


Heres the picture I entered in the competition, you could only send in one picture so I tried to make it look as pro as possible. I just entered the competition for fun and if I place or not I still got a pretty new evening bag out of it!


I can't wait to see what bags are chosen this year!  Thanks for reading! 

Tuesday, April 12, 2016

Wishing for Summer


I was waiting for some nice weather to take these pictures outside but instead we got two huge snow storms and theres a couple feet of snow still out there. So much for the unusually hot Spring we were supposed to have! Maybe if I start sewing my summer wardrobe the weather will get the hint!


I am really loving jumpsuits lately. When I saw this fabric I had a vision of this wonderful jumpsuit! I recently discovered Blackbird Fabrics and I can't believe I didn't know about them sooner! They have such great fabric and they're Canadian! Yay! I am so inlove with this print. And the jumpsuit is super comfy too!


I used an old Vogue pattern 1308. I really liked the pattern, it's a nice simple design which was perfect to showcase this fabric. I left out the ruffle down the front and the drawstrings on the waist. I wanted to keep it plain and simple because the fabric had so much going on.


I used some scraps of brown silk from another project to finish the neck and armhole edges. I finished the armholes in the same way I finished the neck, the pattern called for a different technique but I thought this way it was really clean looking. I chose not to put a zipper down the back neck, instead I sewed it up a bit further and finished the edges separately, creating sort of a keyhole opening, and I added a hook and eye at the top. I also chose not to add the extra piece to create the elastic casing at the waist. Instead I just turned in the waist seam allowance to form a casing, and I used a 3/8" wide elastic rather than the 1" elastic the pattern called for.


Finally, instead of making the facings on the pocket bag, I just used the self fabric to make the whole pocket bag, since my fabric was pretty lightweight. The pockets are really unnoticeable even though I didn't do any print matching.


I did french seams everywhere including the pocket bags.


I really like how my jumpsuit turned out, I think it was a combination of the perfect fabric and a great pattern. I am even more excited for summer now because I want to start wearing this!


Thanks for reading! :)


Tuesday, March 22, 2016

I feel so Missoni

I love the Missoni chevron print so when I saw this knock off knit at Fabricland I needed it! And Vogue 1314 was the perfect fit.


I can see why so many people have made and loved this sewing pattern. It was so easy to sew up and looks really good too. The shell of the pattern was only 3 pieces and the lining 2 so it was quick to cut out. I tried to match the chevrons but they were pretty skewed which made it difficult.


I graded the pattern from a 12 on top to a 14 at the hip like I usually do but I think if I were to make it again I would just make the whole thing in a size 12. I don't know if it was the fabric or what but it was a bit loose at the waist and hip. So the gathers kind of sag instead of being stretched across like I would have liked. My fabric was a bit spongy and soft so that might be the reason, I'll have to see next time.


I didn't alter anything on this pattern. I saw so many reviews of this pattern and everyones versions looked so beautiful. I had never even really noticed this pattern before joining pattern review and seeing all the lovely creations.


This was such a quick project, I whipped it up in almost just one evening of sewing. The next time I sew this I will make sure to stay the neck better. I really stretched it out on this one, I guess I was thinking it was more like stretching the ribbed neck band on a t-shirt but really its just finishing the neck edge with self made bias. Maybe I will try fusing the neck band. I will definitely be making this pattern again, maybe in a slinkier knit and in a smaller size.


.  .  .

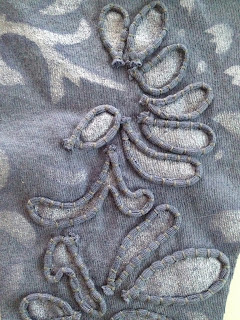
I've been working away at my Alabama Chanin project! I tried out my airbrush and it worked wonderfully! So I painted my thrift store t-shirt and started my corset! I was really lucky when I found this t-shirt, its the perfect weight and a really nice denim blue colour. I found it in the men's golf T section, I think that's why it was the nice, heavier weight. And a plus, it has never actually been worn, tags and all still attached! I used a pearlized white paint mixed with a bit of navy. I was shocked at how much paint it took. I have no experience with spray painting and I mixed one mini vile (like probably 1/8 cup) thinking that would be plenty. Nope! It took the whole original jar of pearl paint, most of the navy and part of a jar of white paint because I was desperate! So the whole pattern is a bunch of different paint mixes because I just kept mixing and guessing and thinking how could this be taking this much paint?!?! But it all worked out in the end so I'm happy! 


The pearlized paint worked out really well, I love the bit of shine it gives it. I used Anna's Garden stencil for this that I cut out myself out of felt. I started couching the first corset piece and I am really pleased with it so far! I can't wait to get it done and sew it up!

Saturday, March 5, 2016

Silk Slip - Vogue 8888

This is a bias slip dress I made for my mom. I've always sort of shied away from bias projects, they just seemed a bit daunting. I worked on a few at work recently and finally got up the courage to try one on my own! Me and my mom are wayyyy different sizes but that's the beauty of bias! It just stretches to fit!


When this pattern first came out I didn't really take a second look at it. I liked the housecoat but thought I would probably never make it. Then looking through old vogue pattern magazine articles I came across this slip dress. I fell in love. I thought to myself "how did I ever miss this slip pattern!!" I was so surprised to find out it was Vogue 8888. I find it just looks so different with the minor changes mentioned in the magazine article. 


I want to make one for myself now, I think I would still make it in a size up and maybe two sizes up in the hip. I thought this project was going to take a really long time but it was surprisingly quick and actually pretty easy! I was worried about fit so I tried it on my mom with just the side seams basted together and it fit perfect with no alterations! 


I used brown silk charmeuse from The Fabric Room, and black stretch lace trim from Fabricland. I haven't hemmed the slip yet, when I do the final fitting on my mom I will even out the hem and add the lace trim. It's been hanging in my studio for a week now and the hem is actually pretty even on the Judy. With bias cut garments its often necessary to even out the hem after letting it hang for at least a few days.  **Update: I tried it on my mom and the hem did need some evening out but it wasn't too drastic. 


My lace trim was only 2" wide, whereas the article called for 3" wide trim. It didnt make much of a difference until I was laying the trim on the skirt front. If I laid it centred on the diagonal seam, the lace didn't meet at the centre where it joins to the bodice. I thought it looked a bit odd, so I just moved the lace over toward the inside of the seam, so they would meet at the top and the seam was still covered. 


I really love the way it turned out! I am really impressed with the quality and fit of this pattern. I know bias cut patterns can be kind of tricky to perfect. I think the elastic lace trim made it really easy to fit, since you could pull it a bit wherever it needed to be a bit more snug. 


Thanks for reading!